Showing posts with label Demolition. Show all posts

Thursday, August 15, 2013

Demolition Derby

Well, considering that we're both teaching this summer (ugh) and Ray currently has seven stainless-steel staples in his scalp following a head injury he sustained during a soccer game, I think we're really coming along on the demolition in the third bedroom.  Unfortunately, we're not going to be able to sheetrock it before my parents arrive.  Because behind the paneling is a situation that could only be described as a hot mess.  Seriously, if you look up "hot mess" in the dictionary, there'll be a picture of our third bedroom next to it. 

You see, I've debated even showing these photos-- because what if someone wants to buy this house years down the road and they somehow stumble upon these photos and think OH MY GOD THAT PLACE IS GOING TO FALL DOWN (which would be a completely normal thing to think at this point, as you'll soon see) and then they don't look at the photos that we'll take after we fix all the issues?

But at the end of the day, we're all about real talk, and I don't want to polish this rat turd (if you will).  And before I reveal the freaking disaster we're going to have to deal with, I'll begin by saying that at this point, the paneling and the acoustical tile ceiling are completely gone.  I did a lot of the work all by my lonesome since Ray's concussed, and there were a couple of times I almost had to run from the room and vomit (like when I discovered several two-inch-deep piles of old dried up maggots behind the paneling under the window) and a few giggles (like when I noticed an entire pinecone peeking out of the top of the exterior wall).  But now all we need to do demolition-wise is take up the carpet and the pressboard tiles underneath it.  And then comes the insurmountable task of putting it all back together.

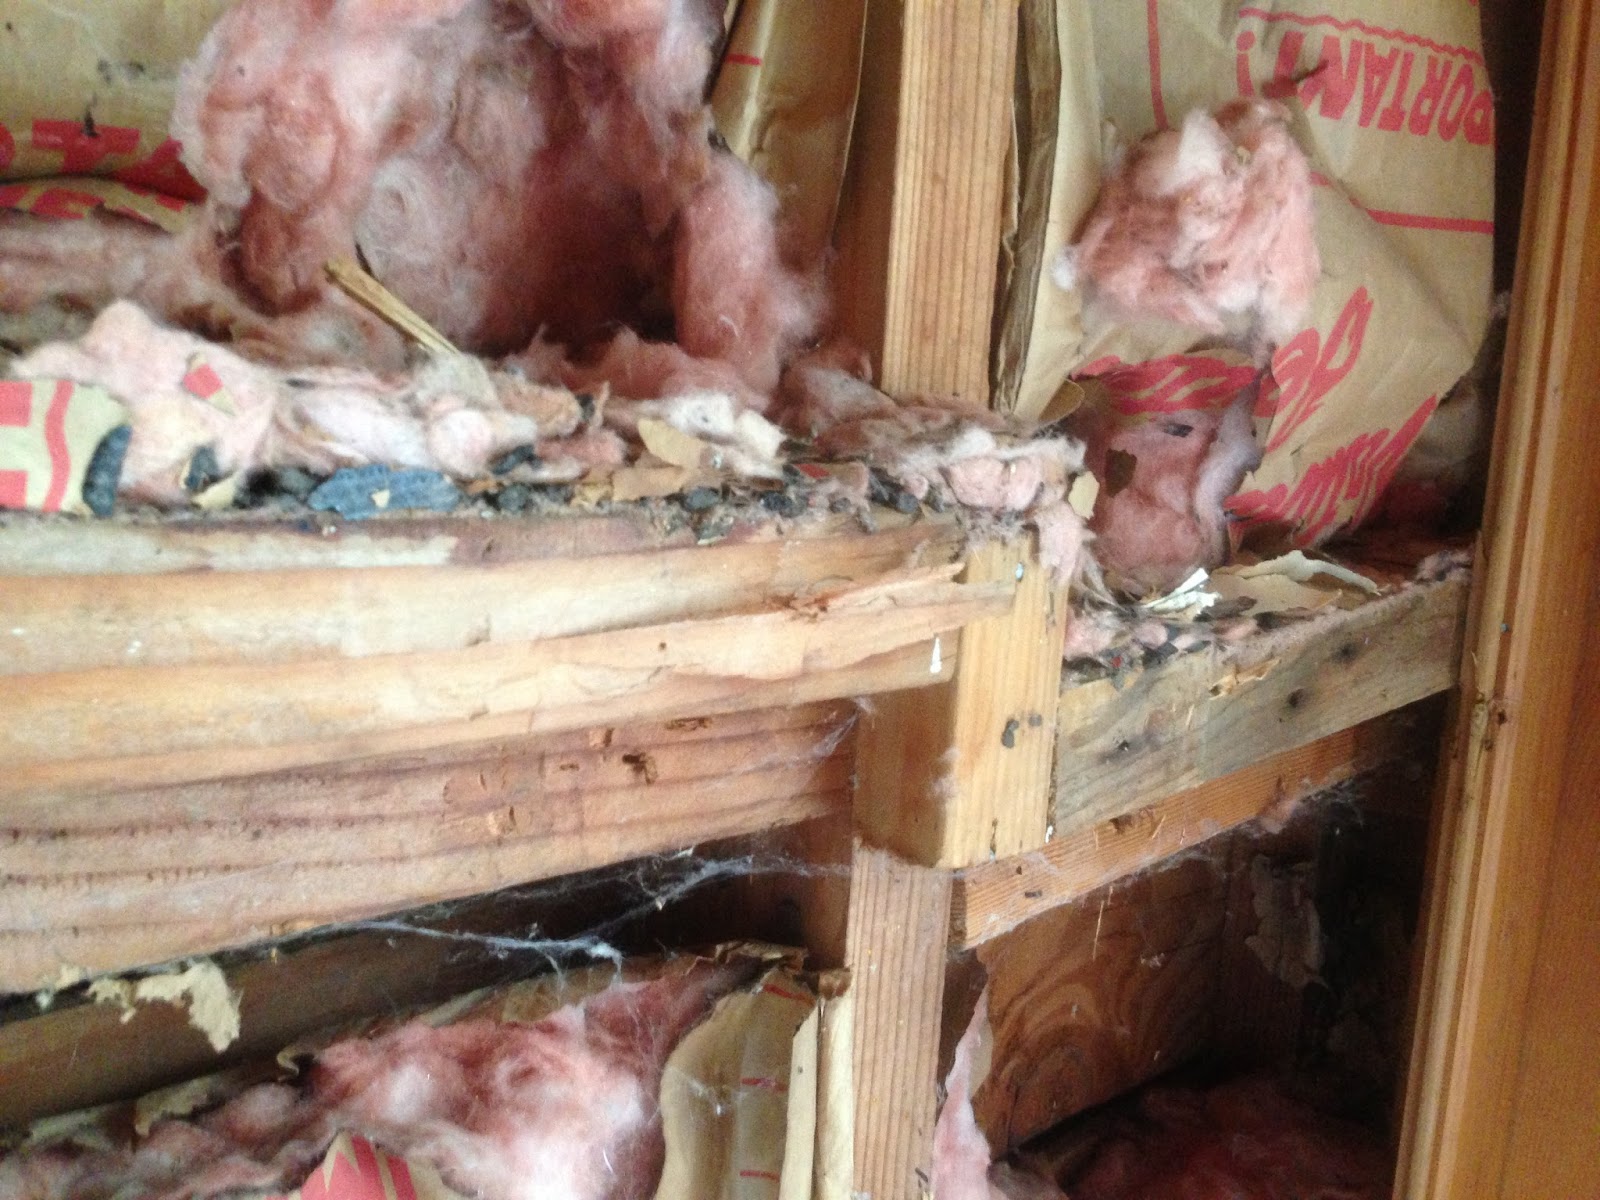
I knew I was in for trouble when I removed the first couple of pieces of paneling.  Understand, this is not cheap-o fake wood paneling-- it's 3/4" thick tongue-and-groove, and every piece was nailed in separately in three to six places.  So it took me a loooong time to pull off the first six pieces.  And when I did, here's what I saw:


Yeah, so... couple of things here.  One: the insulation is randomly inserted into the wall in a way the doesn't even begin to make sense.  But that's no big deal, since we're re-insulating anyway.  The bigger problem is that whoever did this had NO F*CKING CLUE how to frame a wall.  Pro tip: don't D.I.Y if you don't know what you're D.O.I.N.G. 


But really, the next photo shows the big problem:


See how those attic joists aren't resting on anything?  They're (badly) nailed into the wall studs, which keep going up to where their top plate meets the roof supports.  So that part's good-- the roof is properly supported-- but the attic floor is pretty much just floating up there, and it has been for a lot of years.

Additional challenge: the studs aren't quite as deep as the footer, so the construction genius who put the paneling on decided to do... this:


Yup.  What the HELL is that?  This blurry photo shows the top of the wall.  As always, pardon the crap photography.  I think I pretty much deserve a pass on this one since I was wearing a dust mask and safety goggles and work gloves and there was roughly a ton of rat-poop-and-fiberglass dust swirling all around me when I took the picture:


So... good thing my parents are arriving on Tuesday, because they'll know what to do about this.  At least, I hope they do.  Because I sure as hell don't.

Thursday, August 8, 2013

SNAFU*

Last night we pulled down the third bedroom's acoustical-tile ceiling in anticipation of our dumpster's arrival this morning.  We were hoping that all the insulation would be in good shape like what we saw during our exploratory demo:

I keep trying to figure out what those light-blobs are, and I think I'm going with "friendly ghosts."

Unfortunately, this was pretty much the only part of the ceiling where the insulation hadn't been completely devoured by our pals the roof rats.  WARNING: THE FOLLOWING IS EXTREMELY GROSS.  DO NOT SCROLL DOWN UNLESS YOU WANT TO SEE SOME TRULY NASTY SHIT.  SERIOUSLY.  DON'T DO IT.  Consider yourself forewarned.

--proceed at your own risk--

 
--what you are about to see cannot be unseen--


--you should really watch cute kitten videos instead of looking at this--


--you're going to regret it if you scroll down because it is really truly gross**--


**Actually, honestly the rat shit doesn't even bother me anymore.  I mean, I'm, like, aware that it's disgusting, but after a whole year of living in this formerly infested house I'm pretty blasé about it.  Roof rats don't carry hantavirus, and all these turds are really old, and I just don't care that much at this point.  Which is probably why I was okay with whipping out my phone to take a bunch of pictures of feces.  Quick anecdote to 1) show how far I've come in my relationship with rodent shit, and 2) give you another opportunity to back out if you're still not sure whether or not you want to see what I'm about to show you:

When we lived in New Haven, our apartment was the second story of an absolutely beautiful house that'd been built in the 1890's.  It was in an awesome neighborhood (if you're familiar with the area, we were just a block down Orange Street from East Rock Park) where we could walk to bars, grocery markets, downtown, parks, everything.  The apartment had high ceilings, two huge bay windows, a butler's pantry, thick original moldings, a private screened porch, old glass doorknobs on six-panel doors, gorgeous glossy hardwood floors, the works.  I loved it passionately.  Anyway, one day I was standing in the butler's pantry talking to my mom on the phone and idly dusting the countertop, and I noticed these little black bugs hanging out near my potatoes.  I picked one up and then, realizing that what I was holding was actually not a bug but was instead a mouse turd, I screamed into the phone.  I skipped work and disinfected the entire kitchen.  I cried the whole time.  Flash forward to now, when there are inch-long rat turds raining down from the ceiling, and all I want to do is take a picture.  Life is funny.

Okay, are you ready?

Nice nest, huh?

Captive rat turds dangling from the insulation.

 Hi there, rat holes!

 This was the biggest nest.
 
 Pile of contaminated insulation.

 Ick.

So after we pulled all the old insulation down and rolled it up into a giant burrito using the plastic drop cloths I'd put down on the floor, we carted it out to our dumpster.  Which is now full of poop.  So, yeah, we'll be re-insulating before we drywall.

*Which is my all-time favorite acronym-- Google it if you aren't familiar.

Tuesday, August 6, 2013

Third Bedroom, We Barely Knew Ye (Thank God)

Before we totally rip the third bedroom and laundry room apart, I thought we should do a brief retrospective.  Let's take a quick look back at the way they were when we moved in, shall we?

View from kitchen door through laundry room, attic stairs extended, tool closet on the right, horrible filthy mismatched curtains on the big old window:


Laundry room and broken-down attic stairs in all their...glory?


Laundry room a quick coat of paint or four, new appliances, and a curtain over the weird closet-nook:


Blurry photo from the other direction:


Plans for this space:

1.  Move light fixture (i.e., bare bulb dangling from the ceiling) and replace with this.
2.  Build wall to frame out what will eventually become a half bath in the back of the space (the end of the room from whence the above photo was taken.
3.  Hang bathroom door.
4.  Convert tool closet so it opens from the bedroom rather than the laundry room; this will involve replacing the paneling on the back with paneling we remove from the 3rd bedroom.  Ditto the new wall we're building.
5.  Install engineered hardwood flooring in the laundry-room side.
6.  Use bathroom side as a storage closet until we have enough scratch for a half-bath.
7.  Demo cabinets above washer / dryer.
8.  Replace attic stairs and drywall the ceiling.
9.  Build new shelving for laundry supplies.
10.  Trim to match the rest of the house, paint.
11.  Replace the door (and hardware, naturally) between the kitchen and laundry rooms with a glass-paned French door.

Whew, that's a lot of stuff.  Anyone wanna take bets on how much of this we will ever get done?

Now onto the third bedroom:


What we're about to do:

1. Remove acoustical tile ceilings and furring strips, carpet, pressboard tile, paneling, and brick pad / mortar
2.  Get our electricians (an awesome husband-and-wife duo) out to cap off the junction box in the ceiling (the ceiling is too low for an overhead fixture), safely remove the old (unnecessary) baseboard heating and disconnect the wiring, move the outlets (which for some reason are located halfway up the walls) down to the baseboards where normal people put their electrical outlets, and replace the outlets with GFCIs.  We really like our electricians, so I don't feel weird about giving them all that money.  
3.  Drywall the walls and ceilings.
4.  Have the window replaced with one that opens, not only for comfort's sake, but because the we need an egress window in order to have a legal third bedroom.  Happening August 13 on our one-year homeowning anniversary!
5.  Trim windows, doors, and baseboards with moldings that match those in the rest of the house.
6.  Install floating engineered hardwood floors.
7.  Paint.

We're hoping to have a lot of the bedroom work done when my parents arrive in two weeks-- that way they can help us where we clearly need it most (the laundry space).  We'll update as we go, and I can't. freaking. wait. to show off some After photos.  Our first dumpster is arriving tomorrow morning, and the quest for flooring continues.  If you have any good karma to send our way, we'd appreciate it!

PS: You know you're busy when both you and your spouse forget your wedding anniversary until your mom calls to wish you a happy one.  Yep.  That just happened.


Monday, August 5, 2013

3rd Bedroom Demolition Day One: Us, 1; Brick Floor, 0.

This happened yesterday:


Yes, I know that sandals from Anthropologie are not acceptable demolition footwear.  But at least I'm wearing both a dust mask AND safety glasses!

Anyway, after Ray and I took turns busting up the bricks and mortar while the other carted the refuse outside to the site of our soon-to-arrive dumpster, this is what we're working with (blurry photos taken with dusty iPhone as always):


This is my oh-my-God-I-can't-believe-how-easy-that-was demolition selfie:


I know you can't tell but I'm grinning insanely underneath that dust mask.

Thursday, August 1, 2013

Mission: Looking Entirely Possible

So we got our asbestos results via email today, and I couldn't believe my eyes when we were given the all-clear to rip those ceiling tiles out with abandon.  I blinked, like, thirty-seven times in disbelief.  I may or may not have gotten a little teary.  This is pretty much the first bone our house has thrown us, and I'd like to think of it as our place's  First-Anniversary-Thanks-For-Renovatin'-Me gift to us.  

As we were sitting here on the sofa after dinner, reveling in the good no-asbestos news, we started to wonder what we were going to find inside the ceiling.  I'd watched this video and I was pretty terrified that the same fate was about to befall us.  So we decided we'd just do a little exploratory demo, just to see what we were up against.  Demolition masks and safety goggles firmly in place, we picked a random tile and yanked it down.  There was a brief rain of fossilized rat shit, and then... nothing.  Encouraged, we pulled down a few more tiles.  This is what we saw:


Yup!  The insulation is contained in weird cardboard baggie-things and appears to be in good shape!  Now, I know it's full of sixty-odd years or rodent refuse, and I also know that isn't good, but hey-- it's not going to fall down on us and leave as standing in a waist-deep mixture of dusty blown-in insulation and rat turds, so I'm counting this as a huge positive.  See the furring strips that are running vertically in this photo?  We'll be able to pull them down and gain nearly an inch of ceiling height, and the attic joists appear to be in really good shape so we should be able to screw the drywall right into them.  Like a boss.

After that success, I decided to grab ye olde hammer and chisel and see if I could possibly pry up the big brick pad where the bright red chimenea once sat.

Aside: I took a quick antiquing trip to Portland with my girls M, K, and L a couple of months ago, and we were admiring all the midcentury fabulousness in Sorel's, and that's where I saw the EXACT RED CHIMENEA (I mean literally, I think it was the actual same chimenea) we ripped out of our house... selling for $700.  Damn.  That would've paid for a lot of drywall.  I wish I'd known that stylish Sorel's-type people liked red chimeneas.  Oh well.

Anyway, I'd been nervous about this part because it kind of looked like were were going to have to rent a jackhammer to pry up all the mortar.  Silly me-- a hammer and chisel should take care of this, mortar and all, in no time flat.  Here's what I was able to pry up in two minutes:

Sorry, it's kind of dark in there as the only light comes from overhead.  


The pressboard tile (you're seeing it in the bottom left corner of the photo above) is no longer glued down, so that shouldn't be much of a challenge; the carpet you see on the bottom right is attached directly to the pressboard, so we should be able to make short work of it. 

Then, since we're completely insane, we decided to pry out just one piece of the wood paneling.  That put up a bit more of a fight since we didn't want to remove the "baseboards" (which are actually just stained-to-match 2x4's), but we were able to pry it far enough away from the wall to see that nothing terrifying is happening in there.  Nothing is happening in there at all.  There's some insulation in the top half (?) of the wall, but I was expecting mountains of rat shit / dead animal carcasses / live animals / chewed wiring / Pennywise the Clown / the little girl from The Ring / a black hole.  So I'm going to count that as another win.

So, new plan: Ray and I are going to handle the demo and then use my parents' expertise to get the place put back together again.  Maybe they can help us out in the laundry room, where there are some weird-looking structural things going on.  SO MANY IDEAS.   


VICTORY!


Let the demolition begin!

Saturday, January 12, 2013

Our Dirty Enormous Secret

So far on the blog you've mostly seen our public spaces-- the living and dining rooms, bathroom, and master bedroom were the first things we wanted to tackle when we moved in because they're the places where we spend most of our time.  It's felt like slow going, but we're constantly amazed at how different those rooms look-- they've all been painted, the living room had a major fireplace / hearth makeover, the bathroom got a new vanity and mirror and baseboards and hardware (and lost its soffit), and in the master bedroom we've changed the closet doorknobs and the ceiling fixture and also ripped out a weird doorless cabinet.

But now, with the entry closet / distraction project in its final stages (just waiting for the paint on the top shelf to dry before we can pop it back in), we've been thinking a lot about where to go next.  And we're thinking it's time to tackle the Dreaded Third Bedroom.  


So far I've carefully avoided showing any photos of the third bedroom because it is just. so. ugly.  I mean it is UGLY.  Don't believe me?  Well, here you go:


Yeeeeaah.  So.  

The third bedroom was once our house's garage until some enterprising former owner decided to "finish" it.  It's accessed via the laundry room, which is off the kitchen, so the first major issue with the third bedroom is that it's kind of in a no-man's land.  At the moment, its location is a point against it-- it's all the way across the house from the other bedrooms and there's no bathroom nearby-- but we have big plans for this baby.

But before we get to all that, let's talk a little more about its major malfunctions.  First and foremost, its biggest downside is that it looks nothing like any of the other rooms in the house.  It's kind of like two different houses-- one cute 40's bungalow and one butt-ugly 70's basement-- are spliced together.  The third bedroom has paneling and carpet and acoustical tile where the rest of the house has plaster and hardwood and coved ceilings.  Second, at the moment it's completely useless as a bedroom-- those paneled walls aren't even insulated.  Third, it's not a huge space-- I'm estimating maybe 12' x 14'-- so it's not quite big enough to serve as a combination queen-bed guest room and office.  And as you can see, at the moment we're using it as a storage / junk room.   Here's a view through the laundry room (where I'm drying some of Ray's flannel shirts) and into the kitchen (where the closet shelves are drying):


See that uncarpeted square in front of the door?  That's pressboard tile.  Oh, you've never heard of that?  Me neither!  It's under the carpet too, and it's not even glued down, so when you walk on the carpet you sort of squish around.  So weird.  And there's also this:

 
See that brick pad on the floor there?  When we first looked at the house there was-- no joke-- a red chimenea sitting on it.  The chimenea was illegally installed and not vented to the outside, so it was removed as a condition of closing.  We were not sad to see it go.

So why tackle this room now?  

First off, this is a part of the house that we're not using at all, and that makes it a good candidate for a reno for three reasons:

1. If it takes us forever to get it done while we work full-time, that's okay-- at the end of a weekend of reno we can just shut the door and forget about it during the work week.

2. We'd like to be able to use it as an office, and while we're not currently planning to add to our family, we'll need a guest room if we do. 

3. We've thought since the minute we first saw that house that fixing the third bedroom would be a really important update for resale purposes.  If we can't use the space, neither will the next owners, and we don't want to give future buyers any excuse to not love the hell out of this place.  It's a decent-sized chuck of our square footage, and it needs to be be an attractive selling feature despite its odd location in the house.

Another reason we're eyeing this space right now: of all the major renos we need to do (kitchen, rest of bathroom, laundry room), this should be the cheapest, easiest, and most DIY-friendly.  We don't need to move or add any plumbing or electrical or HVAC, and not a lot of finesse is going to be involved.  We're not naive enough to think it's going to go 100% smoothly, but we feel like we can handle most of the work on our project list:

PHASE ONE:  DEMO
We'll rent a Dumpster and remove every surface in the room.  Gone will be the paneling, the acoustical tile ceilings, the filthy carpet, the brick pad that once supported the chimenea, and the pressboard tile floors.  To be honest, this is the only phase that worries me-- if the ceiling tiles turn out to contain asbestos, we'll have to put the whole project on hold because we don't have the extra scratch to pay a pro for asbestos remediation at the moment.  And we'll probably have to have our first jackhammering experience in order to get the brick pad up.  And I can't even imagine what sort of fresh hell is probably hiding behind that paneling.  But we'll get it done.  Right?  Won't we?

PHASE TWO: INSULATE & PREP
Walls and ceiling will both get some new insulation so the place feels less like the inside of a freezer.  The floor will likely need to be leveled.  Fun times.

PHASE THREE: PUT 'ER BACK TOGETHER
Sheetrocking shouldn't be a huge hassle in here-- the ceilings are fairly low and we should be able to drywall them without renting a drywall elevator.  We'll be dealing with big sheets of drywall that have nice factory edges for once, so the taping and mudding will be manageable.  We'll trim the windows and doors with the same kind of millwork that's in the rest of the house.  We'll use peel-and-stick faux hardwood or laminate (whatever we can find to closely approximate the oak in the rest of the house) on the floors and finish them with nice baseboard.

Not sure when we'll get started, but I'll keep you posted.  In the meantime, here's a teaser shot of the entry closet in all its peacock-blue glory:


More on that tomorrow.

Saturday, November 17, 2012

What a [Terrifying] Difference A Day Makes

So, The Thing.  We removed it this afternoon.  It was a long process--  while this house has many quirks (and we found quite a few of them inside the ceiling today) one thing is for certain: it was built to last.  The Thing fought us hard.

At first, it was all fun and games.  Yay demolition!  Doing something like this is kind of like popping a gross zit.  It's really disgusting but still somehow satisfying.  Too much information?  Sorry.  Here's a picture that isn't of Ray popping a gross zit:


You know what else is kind of like a gross zit?  The blue plastic faux marble shower surround.  I can't wait to pull that off the wall and confront the moldy horror that surely lies behind it.  Summer 2013 here we come.

Anyhow, good thing we taped a drop cloth over the bathtub to protect the plumbing, because there was A LOT of crap in the ceiling.  And by crap, I mean there was literally crap in the ceiling.  Showers of old fossilized rodent feces fell down upon us as we disassembled The Thing's frame and detached its top plate from the ceiling.  Here's Ray in a death match with the top plate:


See all that wire armature hanging down?  Well, as we discovered, this is because underneath the drywall ceiling is the original plaster ceiling, armature and all.  And in some places there's some weird 1/2in. thick paperboard.  The more we ripped away, the more we realized that this wasn't going to be a quick cut-drywall-to-fit-and-screw-it-into-the-nice-level-ceiling type of job.  

And we weren't wrong: we wound up having a LOT of drywalling issues.  We had to shim the the gap in a bunch of places to make it level and the right depth for drywall; in other places the weird paperboard was jutting out into the gap and we didn't want to cut it since we have no idea what it's doing there (probably holding up the roof-- who knows?), so we sort of had to drywall around it.  The wire armature, which we cut back as much as possible without damaging the rest of the ceiling, stubbornly refused to get out of the way in several spots.  And since the width of the gap was wildly inconsistent and there were tons of obstructions in it, we basically had to use 37 small pieces of drywall to even remotely patch the thing.  And when we ran out of shims before getting to the last side piece, we realized we were just going to have to clean up and call it a night.

And boy is it going to be really fun to tape and mud our new irregularly shaped, seam-tastic drywall to the wavy, uneven, water-damaged ceiling.  

All this leads to a sort of sad finish: I can't even show you a close-up because it's too awful-looking right now.  But the photo below shows the unfinished side-- off to the hardware store in the morning for more shims and some metal corners:


And when we're all done affixing the last piece and taping and mudding and spraying the whole patch with orange-peel texture so it'll blend into the rest of the ceiling, I'm going to paint the whole room a nice soft blue with lots of gray in it.  And then I'm going to drink a whole bottle of gin.  And when I sober up we'll tackle the floor, and the tile, and the light fixtures, and kfnxbfjabfjgfhdbjx we will never ever finish all of this. 

PS: The plumbing problem in the kitchen is fixed-- thanks for asking!  It was a broken pipe behind the sink.  Repaired in one hour to the tune of $275.  Meh.  Cheaper than we thought.

PPS: Our work today was interrupted by a run-in with-- no joke-- a rabid squirrel.  Some friends had stopped by to see the progress we'd made on the house, and we were standing on the back porch surveying the changes in the yard when a tiny stumbling ninja-squirrel jumped on the porch and started charging towards us.  It literally lunged at our friend.  We chased it away with a rake and ran inside.  The four of us stood in the dining room and watched out the French doors as it tried to climb a few trees and crashed to the ground each time.  We called the cops (no animal control out here on weekends) and they came out, but by then the little would-be assassin was gone.  Turns out that a kid was bitten by a squirrel on the other side of town yesterday, so we're supposed to be on the lookout for it... 


Wednesday, November 14, 2012

Temporary Insanity

We've had a few issues with the ol' house of late.  Like this, for example: a couple of weeks ago, we started smelling a bit of musty funk in the kitchen.  No big deal, we thought-- that's the same musty kitchen-funk the house had when we moved in, and it went away.  And maybe it's just because the rainy season started and everything is perma-damp and our "cabinets" (see previous posts) do not have actual bottoms OR a plywood sub-floor under them.  So whatever it smells like under the house, that's what it smells like in the kitchen.  No worries!  We'll just deal with a touch of stink until we're ready to gut the kitchen and put it all back together in a way that makes a little more sense.  Right?

Wrong.  We happened to be outside while running the dishwasher a couple of days ago, and we noticed a ton of soapy water bubbling up from the ground.  And out of the crawl-space.  And sort of dripping out of a weird faucet under the kitchen window at the same time.

We don't know anything about plumbing, but even we're smart enough to know that water exploding from under your house coupled with a moldy smell means bad news bears.  Plumber's coming tomorrow morning, and since it costs $250 every time he darkens our door for even the most minor of issues, we're preparing ourselves to fork over at least a couple of G's to get this taken care of. 

And we've totally died on the hearth tile project-- the only pre-mixed grout we can find locally is white, and I'm not trying to buy an enormous bag of dry grout and mix a huge bucketful of charcoal-gray for a job that will require less than two tablespoons of the stuff.  We just need enough to fill three 1/16" gaps, for crying out loud.  And the only locally available slate sealer comes in a giant vat that costs $40.  Again, I need, like, 1/4c.  Sigh-- I hate being stymied.

So tonight after dinner, I was on speakerphone with my parents, and I was talking to them about one of my bathroom's stupidest features.  I haven't the slightest idea of what it's called, so I'll provide a photo:


The silly thing in question can be seen right above the far end of the shower curtain.  It's like a part of a wall that drops down from the ceiling along the tub's edge.  I guess it's technically a soffit, though the ceiling isn't lowered on the other side of it.  Anyhow, it's hard to write coherently about the thing (heretofore known as The Thing), but it's a common feature in lots of 40's houses, when, I'm guessing, the tub enclosure didn't include a shower.  Must have been nice back then, taking a bath in your own little private nook. 

Fast forward to 2012, when this weird little design feature does nothing but trap tons of water vapor into the space above the tub.  Even our bathroom fan is powerless against The Thing.  So we've been planning to rip it out.  A few more reasons to demo The Thing:


1.  All that trapped water vapor has caused pretty serious cosmetic damage to the ceiling about the tub.  It's all bubbling paint and chipping gypsum board up there.  Ick.

2.  Mold is growing on the bottom of The Thing because off all the moisture it holds hostage above the tub.

3.  When the vapor cools and becomes condensate, it drips down the walls inside the tub.  We know it's running down behind the Terrible Blue Faux-Marble Monstrosity, and we don't even want to THINK about the mold that's surely back there now.  We can't rip THAT out now, so the next best thing is to stop the dripping before the mold gets any worse.

4.  It is butt-ugly.


So back to the part where I'm on speakerphone with Mom and Dad.  I'm telling them about our plans for ripping it out, and I'm expressing some worries that perhaps The Thing is somehow structural or that it's full of plumbing and/or electrical wires.  There's a silence on my parents' end, and then my dad says, "Well, why don't you just knock a hole in it with a hammer and see what's going on in there?"


And I'm like, "Okay," and the next thing I know I'm staring at a 3" hole in 
The Thing.


Looks clear in there.  I keep going.  Did I mention it's 9pm on a Wednesday?

Next thing I know, I've used a drywall saw and a prybar to remove a significant chunk of The Thing:


Other than what appears to be a little bit of rebar at the top (?) we're off to what seems like a pretty decent start.

So I guess we'll be finishing that job this weekend?