Showing posts with label Before. Show all posts

Tuesday, October 15, 2013

All the Trimmings

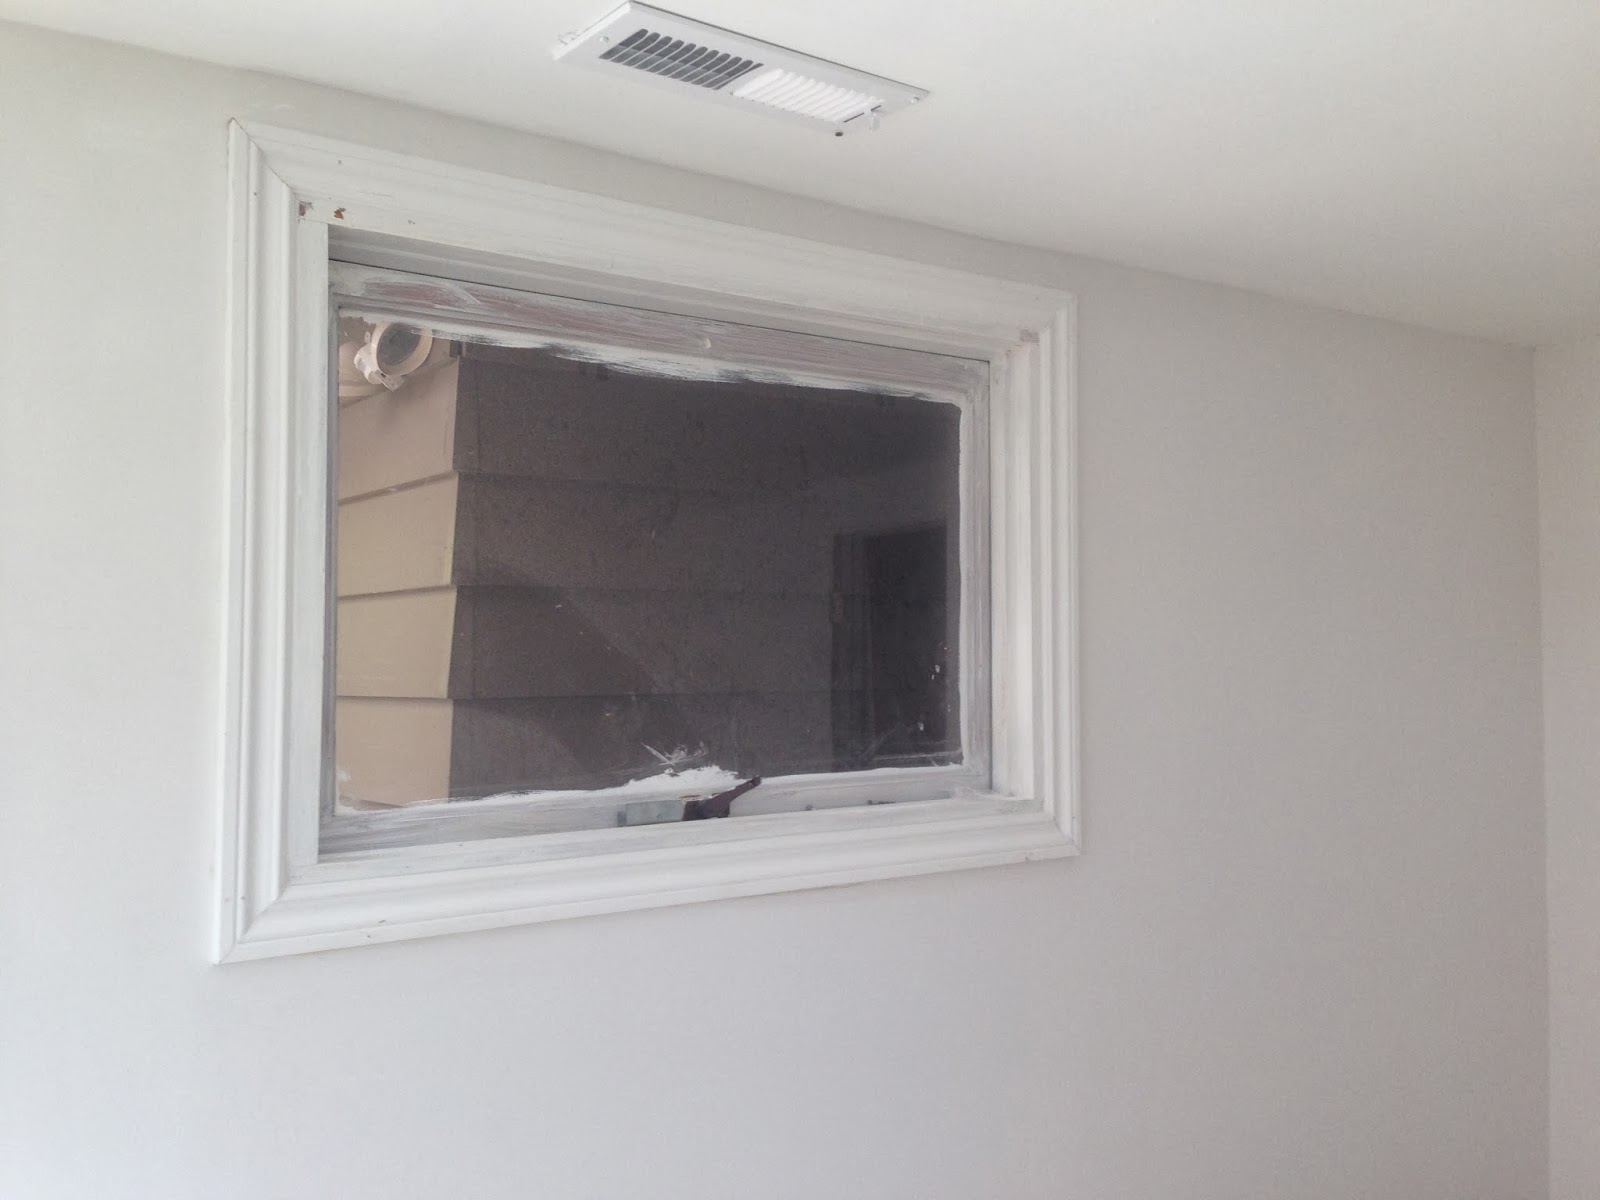
A sunny day in Oregon means a few more progress photos!  Not for the first time and certainly not for the last, your before shot of this angle:


And this morning:


You're seeing a few things in this photo.  First, drywall!  Yay for drywall.  I hate drywall mud with a fiery passion, but damn if I don't love the results.  Also, you're admiring my beautiful new window.  It opens!  And it's a legal egress window!  And it's pretty.  Win-win-win.  

You're also seeing a test-run of our new flooring.  Isn't it stunning?  It wasn't the cheapest option (though at $3.49/sq.ft., it's quite a bit cheaper than lots of other engineered hardwood), but it really closely matches the flooring in the rest of the house.  Our end goal has always been to make this room feel like it belongs in our home, and I think this flooring (despite costing $1 more per square foot than I'd originally hoped to spend) really goes a long way.

You're probably also wondering what the hell is happening at the bottoms of the walls, though.  Good question.  Those are the cinder-block footings for our walls (oh, the joys of what you find when you rip out old paneling).  You can also see the water pipe (which we'll be disguising with some built-in storage) in the center of the photo.  Here's a closer look:


But hey, you're also seeing our now-covered outlets!  And how's this for ya:


That's right!  I trimmed out the small window, and I think it looks about a thousand times better than it did here:


Or even two days ago:


Next up: trimming the big window and laying the floor.   Fingers crossed we can get most of that done this weekend.  Slow and steady wins the race.


Friday, October 11, 2013

State Of The Bedroom Address

Well, it's been a solid two months since we started demo on the third bedroom project and nearly a month since my last post.  We've been very busy at work (I won't bore you with the details) and we're also experiencing the appallingly early beginning of the rainy season.  Our old sofa is now sitting squarely on the third bedroom's still-unfinished floor along with a chair I scored when my friend M moved cross-country (more on both of those later).  All of these things sort of combined to mean I have absolutely zero acceptable photos of the now-painted walls and ceiling in the bedroom.  Either we're too busy or it's too dark out or I'm too embarrassed by our lack of progress to photograph it.  But today I'm sucking it up, so get ready for the first (crappy) photos of the paint job.  And I have to say, I'm very proud of my drywall.  To badly paraphrase classic horror villain Jame Gumb, I'd hire me.  

First, let's go back to the beginning of this project just to remind ourselves of how it used to feel in this room.  I present this photo without comment:


Now, if you'll pardon the dark photos, a bit of before and after...

Northwest corner then:


Northwest corner now:

 
North wall then:


 North wall now:


 Ceiling then:


 Ceiling now:


 So in case you're wondering, yes, I totally painted it almost-white.  It's actually the same color as the living room (Behr's Irish Mist), and once we get some nice glossy white trim going on in there, it should look a bit more like the pale gray it actually is; here's an old shot of the wall color / trim color contrast in the entryway.  Hi y'all!


The only reason the ceiling color and wall color appear so identical in the above photos of the bedroom is that it's dark in there right now.  The Pacific Northwest is tough for interior photography, and/or I have no idea how to artificially light a space before photographing it. 

So what's left to do?  A lot.  

First, flooring.  We're hoping to tackle that soon, but we need to get the old sofa out of there.  I've found a buyer who wants to come get it next weekend.  

[So, yeah, side note: after a couple of days of sitting on the new couch, we noticed that the giant gap in the cushions magically closed up-- the manufacturer assured me it would happen, and it did-- and the down has relaxed quite a bit, which makes the thing really comfortable.  Photos next time I clean the living room, I promise.] 

Anyway, the flooring I found was both budget-friendly-ish and a really close match to the hardwood in the rest of the house; like, it's close enough that I'd put it in the kitchen right next to the original flooring.  We've got the underlayment and we're ready to get started as soon as possible, but when you live in a 1350 square-foot house, there just aren't a ton of places for your old sofa to hang out.

After flooring, trim.  And that's going to be quite the project.  To make a long story short (too late), there are some big molding challenges in here, and we're going to have to get creative.  One of the many things we need to address is the pipe that feeds our outside spigot-- it sticks up through the floor and exits the house under the big window.  I'm currently leaning towards using this IKEA Besta unit to cover up the problem; I'd need two of those and one of the matching half-width ones to span the wall under the window.  They're available with pretty Shaker-style drawers; so they'd make GREAT storage if we chose to go that route; we could also go drawer-less and use the shelf space since, as two academics sharing 1350 square feet, we are under constant threat of being buried beneath a pile of books.  We'll add trim to make them look built in (there'd be a three-inch space on either side we'd have to cover with trim, no big deal) and I think they'll look nice and intentional rather than DIYed-because-of-the-spigot.

That's all for now-- tonight we're off to hear an author talk about his memoir, "Another Bullshit Night in Suck City."  Living four blocks from a major university definitely has its perks.


Thursday, September 5, 2013

[The Laundry Room] Wasn't Built In A Day

Let's take a quick look back at the late, not-so-great laundry room of yore:


Above is what it looked like from the third bedroom when we toured the house for the first time.  Dark, scary, and dirty with paneled walls and acoustical tile ceilings.  Let's see if I can dig up a few more photos:


Above: From the kitchen door after the washer and dryer were removed (the former tenant took them when he left).  That's the attic pull-down in the foreground and two weird closet-y things on the background, and that brick is the back of our chimney.


Above: again with the tenant's stuff during our home inspection.  This one was taken from the door leading outside to our breezeway.


I took the above shot after we got our new washer and dryer after a generous assist from my sister and brother-in-law-- without whom we would definitely not have been able to afford pretty white front-loaders-- and after I painted all the paneling white.  I think this was... late September of 2012?

 Again with the white paint job, this time the photo was taken from the kitchen door.

I'm not sure if you can tell in any of these photos, but the laundry room ceiling was beginning to sag.  The weight of the pull-down stairs was a bit much for it.  So we needed to shore it up a bit before we could proceed with any renovations, and we also wanted to frame in a space for the half bath we'd eventually like to put in.  The solution was to put a wall up immediately behind the pull-down stairs, thus turning all the space behind it into a potential half-bath (for now it's just a killer closet).  

In order to make room for the bath, we also needed to stack the washer-dryer, which meant removing the "cabinets" that were over them before.  The cabinets were, like all the others in this house, really just open-backed boxes with shelves sitting on ledger boards, and they were covered with old funky peeling shelf-paper.  And some rat poop on the top shelf (I'm guessing it fell down from between the attic floorboard--the acoustical tiles didn't extend into the cabinet, so the top shelf was pretty much open to the attic).  Suffice it to say I wasn't sad to see them go-- you generally don't want something that's been pooped on by rodents that close to your clean clothes.

We needed to move the junction box for the ceiling fixture from the low end of the ceiling (over the washer and dryer) to the high part so the washer and dryer would have enough clearance to stack, and our electrician took care of that for us when he was here addressing the situation in the third bedroom. 

Finally, the laundry machines have to sit about eight inches away from the wall because of the very enormous hookup for the dryer vent, and so the first thing you saw upon entering the laundry room from the kitchen was a whole mess of crap behind the dryer.  Some genius screwed a sheet of plywood against the wall (ostensibly to cover up some wires) and we really didn't have the know-how to address the situation.  Here's a dark photo to explain what I mean:


So in order to hide all of that and also make the laundry room look more like a hallway and less like a laundry room, we built a shallow wall.  We also needed to construct a soffit over the washer and dryer to accommodate some wiring at the ceiling.

While I still have a lot of taping and mudding to do in here, and we still need to hang the new ceiling fixture and put in flooring, and I still have to paint the shiplap behind the laundry machines, I'm just too happy about all the changes to wait til it's done.  I have to show you now.  Here's the view from the third bedroom as of this afternoon (again, please pardon the dark photos-- there are no lights in here yet!):


The future bathroom is behind that curtain-- it'll obviously have a door when it's ready to be a bathroom.

Cabinets are going to be installed to the right of the laundry machines so we'll have lots of storage.

From the kitchen door:


 From the third bedroom proper, through to the kitchen:


It's getting the same hickory engineered flooring as the bedroom.  

tl, dr: same view, July 2012 to September 2013:


,dWGFCKQ;OSDHjabsmvhvamdhkquhKjagdjyBAB.  That's me being excited!

Friday, August 30, 2013

Can't Stop The 'Rock

Sheetrock, that is.  We can't stop it.  Because if we do we will never finish it.

While my parents were here, we accomplished a massive amount of work.  Unfortunately, that means we have a lot of finishing to do.  First, we-- wait, let's back up for a minute and check out some befores and durings.

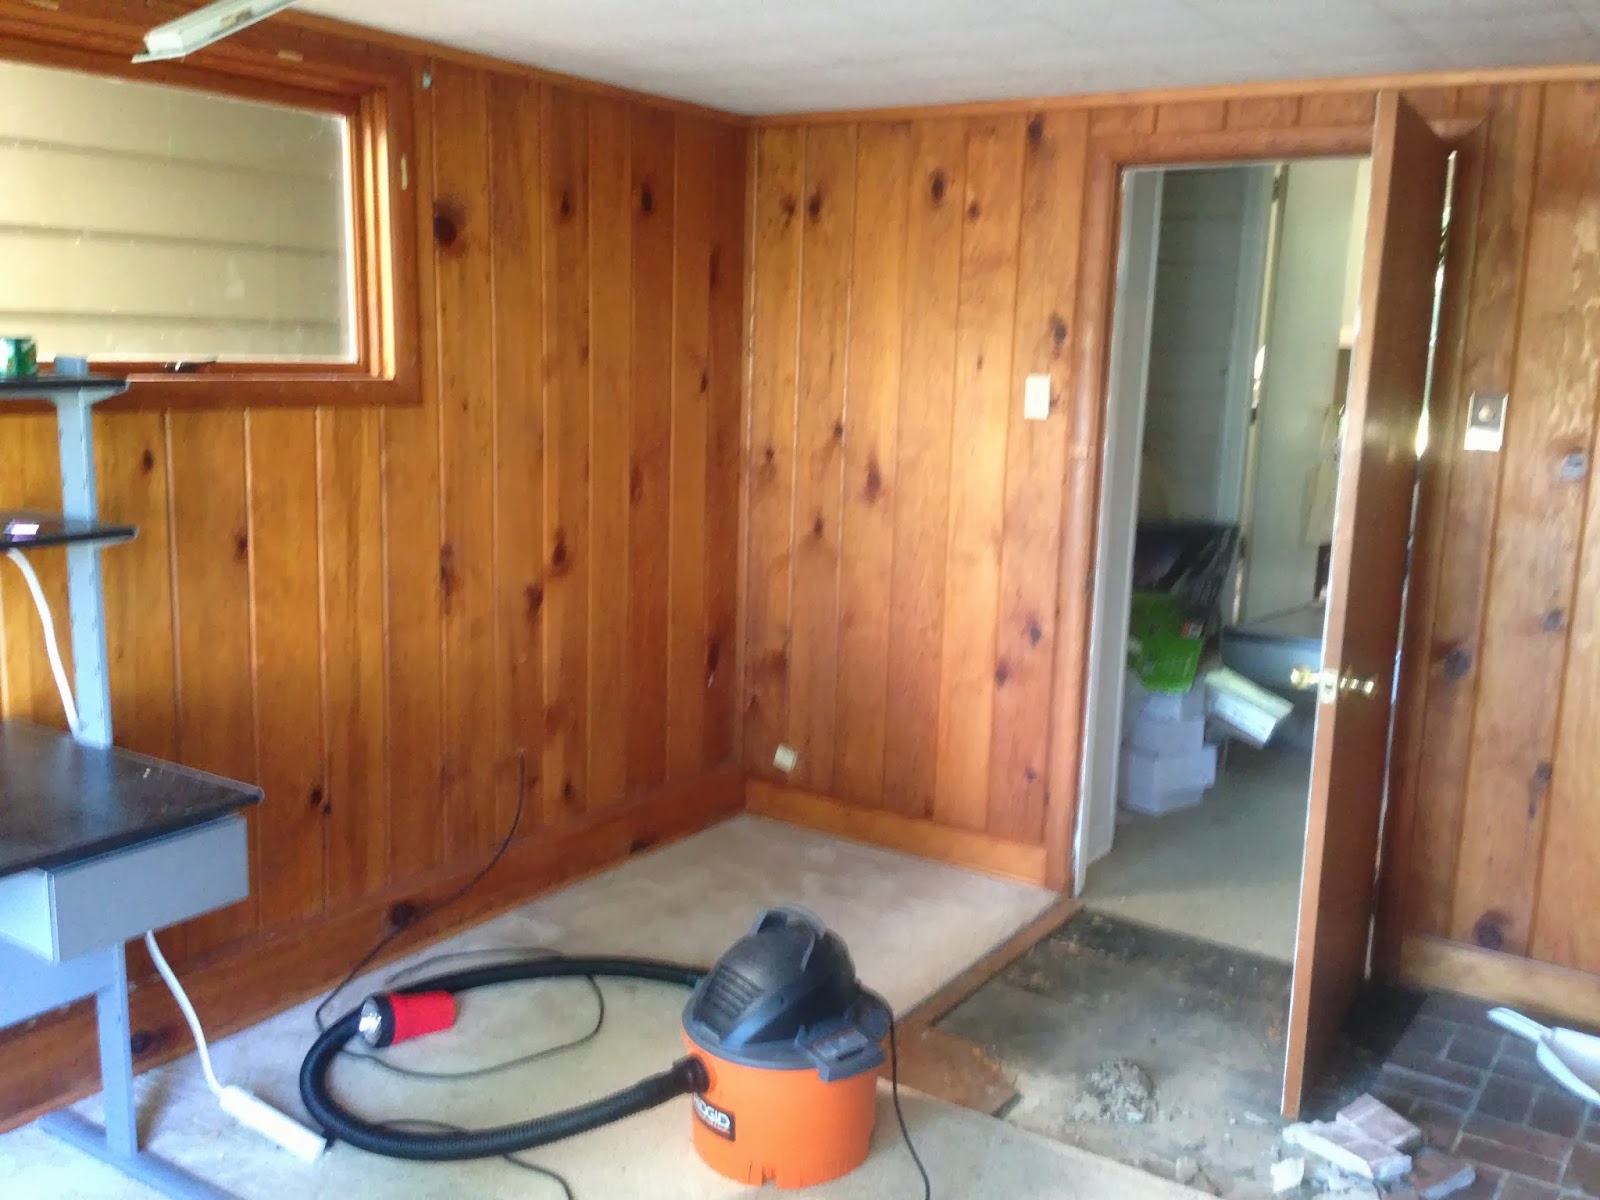
Here's a pretty good "before."  And by pretty good, I mean it shows how truly hideous the bedroom used to be.  Dark paneling, stained and sagging acoustical tile ceilings with a huge red thing hanging down (the red thing was the ceiling cap for the chimenea that used to be in this corner), awful dirty / ugly / smelly carpet, a brick corner, some pressboard tile (you can see it peeking out from beneath the carpet under the door), etc:


Here's the same view as of this morning.  Sorry I forgot to close the door, but I think you get the idea:


Here's another vista that really captures the frankly depressing quality the bedroom had before:


And same view this morning:


Something else very exciting happened in our house a couple of weeks ago and I completely spaced on posting about it, so here's a before of the weird (broken, funky, badly painted) fixed window we used to have:


And now, ladies and gentlemen, I present to you... a huge and beautiful legal egress window!


That one's in the living room (why don't I have any pictures of the bedroom one?) but it's identical to the one in the bedroom in every way.  Pretty.

Anyhow, along the way we ran into more than a few snags-- I'd say the sheetrock job in here was / is just about as complicated as sheetrocking can get.  Ray and Dad did all the work-- they had to cut around SIX outlets, a light switch, a cable, and two ceiling vents.  Add that to the fact that nothing in here is square (love my old house!) and that all the joists and studs had to be brought to the same level plane so the drywall could be attached, and you have a loooooooot of work to do.  So here's what we did:

1.  Demo.  See previous posts.  It was really gross.
 
2.  Electrical.  We had some outlets converted and some code violations addressed professionally.  Now we're safe and modern and up to code. 

3.  Insulation.  Fresh, clean insulation with no poop or rat holes in it!  Luxury, right?

Here's Dad standing in front of the newly insulated wall right after the first two sheets of drywall went up on the ceiling:


3.  Structure.  Adjusting levels / adding some support posts / getting ready for drywall install.

4.  Drywallin'.  It took days, but it was worth the time.  Good install means easy taping and mudding!  Sort of.

5.  Finishin'.  I'm presently on my second coat of mud all over the room (except the corners and the ceiling).  I'm nervous about the corners-- corners are tricky-- and I'm just dreading the ceiling because sanding drywall over your head is just plain awful.

So here's what we still have to do:

1.  Finish-coat of mud on the seams and screw-divots.
2.  Tape and mud ceiling and corners.
3.  Waterproof the concrete footings and address some complicated moulding issues (post coming soon!) and trim the door and windows and install baseboards. 
4.  Level the concrete subfloor, losing our self-leveling-concrete virginity in the process.
5.  Install underlayment and engineered hardwood flooring (Bruce Wheat Hickory from Home Depot is the winner, more on that to come). 
6.  Paint the room.
7.  Furnish it.
8.  Enjoy it.


Now if you'll excuse me, I need to call the company that's shipping my new sofa and arrange a delivery date.  So much excitement!


Wednesday, August 21, 2013

Rebuilding the Third Bedroom: Day One

One day of work on the reconstruction of the third bedroom is complete.  In a few days, it will rise, phoenix-like, from the rubble of its former self.  Today was kind of messy and insane, but I'll sleep a little better tonight knowing that attic floor is fully supported and won't come crashing down on our unsuspecting guests.  

Today Ray and my dad (with regular assists from Mom and me) sistered all the torn-up attic joists and supported them with new studs.  First we put up a T-post to support the joists temporarily, then we set our new 2 x 6 joists.  This shot shows the first sistered joist going in:


Here's a little more progress:


And here's my feels-guilty-just-standing-here-while-Dad-does-all-the-work selfie:


Now all the joists are sistered and secure and they're all perfectly level for drywall install.  It wasn't an easy job, partially because the old fir joists and studs are incredibly hard, and whoever did this the first time left behind about 67 bent nails in every board we had to remove to make our fixes.  I took the following photo of some of my favorite bent nails and nail-filled bits of fir:


Yes, that is a piece of wood with seven bent nails in it.  And I LOVE the nail in the center of the photo-- I have no idea exactly how you make a nail turn at a right angle and then loop around into a hook, but evidently it's possible.  So... that's what's been holding up my attic since the 60's.  SO lucky it never fell in.  And so grateful my parents are here to help us do all the stuff we could never, ever, ever do ourselves.  We're learning everything we can and filing away lots of knowledge for future renovations.  Kitchen, I'm looking at you.

On deck for tomorrow: prepping the walls for drywall, moving some wiring, insulating the ceiling, etc.  I can't wait for this space to start looking like an actual bedroom!

Thursday, August 15, 2013

Demolition Derby

Well, considering that we're both teaching this summer (ugh) and Ray currently has seven stainless-steel staples in his scalp following a head injury he sustained during a soccer game, I think we're really coming along on the demolition in the third bedroom.  Unfortunately, we're not going to be able to sheetrock it before my parents arrive.  Because behind the paneling is a situation that could only be described as a hot mess.  Seriously, if you look up "hot mess" in the dictionary, there'll be a picture of our third bedroom next to it. 

You see, I've debated even showing these photos-- because what if someone wants to buy this house years down the road and they somehow stumble upon these photos and think OH MY GOD THAT PLACE IS GOING TO FALL DOWN (which would be a completely normal thing to think at this point, as you'll soon see) and then they don't look at the photos that we'll take after we fix all the issues?

But at the end of the day, we're all about real talk, and I don't want to polish this rat turd (if you will).  And before I reveal the freaking disaster we're going to have to deal with, I'll begin by saying that at this point, the paneling and the acoustical tile ceiling are completely gone.  I did a lot of the work all by my lonesome since Ray's concussed, and there were a couple of times I almost had to run from the room and vomit (like when I discovered several two-inch-deep piles of old dried up maggots behind the paneling under the window) and a few giggles (like when I noticed an entire pinecone peeking out of the top of the exterior wall).  But now all we need to do demolition-wise is take up the carpet and the pressboard tiles underneath it.  And then comes the insurmountable task of putting it all back together.

I knew I was in for trouble when I removed the first couple of pieces of paneling.  Understand, this is not cheap-o fake wood paneling-- it's 3/4" thick tongue-and-groove, and every piece was nailed in separately in three to six places.  So it took me a loooong time to pull off the first six pieces.  And when I did, here's what I saw:


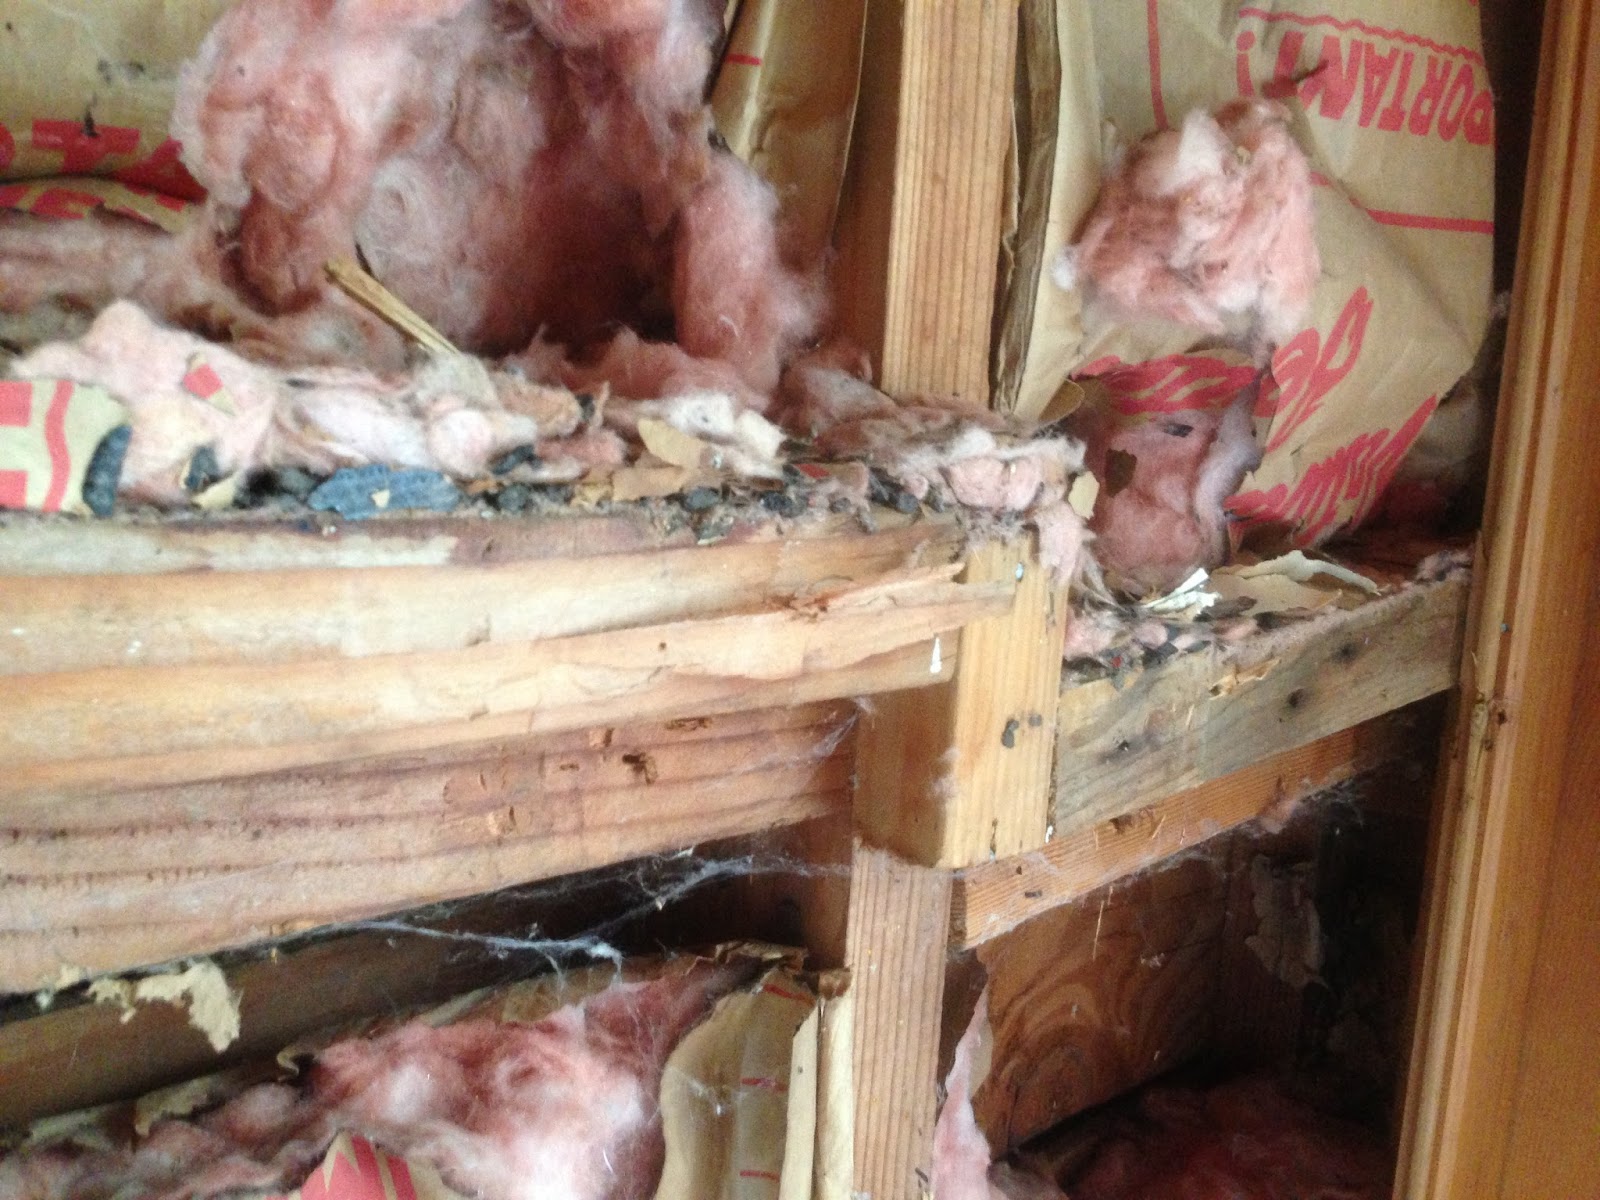
Yeah, so... couple of things here.  One: the insulation is randomly inserted into the wall in a way the doesn't even begin to make sense.  But that's no big deal, since we're re-insulating anyway.  The bigger problem is that whoever did this had NO F*CKING CLUE how to frame a wall.  Pro tip: don't D.I.Y if you don't know what you're D.O.I.N.G. 


But really, the next photo shows the big problem:


See how those attic joists aren't resting on anything?  They're (badly) nailed into the wall studs, which keep going up to where their top plate meets the roof supports.  So that part's good-- the roof is properly supported-- but the attic floor is pretty much just floating up there, and it has been for a lot of years.

Additional challenge: the studs aren't quite as deep as the footer, so the construction genius who put the paneling on decided to do... this:


Yup.  What the HELL is that?  This blurry photo shows the top of the wall.  As always, pardon the crap photography.  I think I pretty much deserve a pass on this one since I was wearing a dust mask and safety goggles and work gloves and there was roughly a ton of rat-poop-and-fiberglass dust swirling all around me when I took the picture:


So... good thing my parents are arriving on Tuesday, because they'll know what to do about this.  At least, I hope they do.  Because I sure as hell don't.

Thursday, August 8, 2013

SNAFU*

Last night we pulled down the third bedroom's acoustical-tile ceiling in anticipation of our dumpster's arrival this morning.  We were hoping that all the insulation would be in good shape like what we saw during our exploratory demo:

I keep trying to figure out what those light-blobs are, and I think I'm going with "friendly ghosts."

Unfortunately, this was pretty much the only part of the ceiling where the insulation hadn't been completely devoured by our pals the roof rats.  WARNING: THE FOLLOWING IS EXTREMELY GROSS.  DO NOT SCROLL DOWN UNLESS YOU WANT TO SEE SOME TRULY NASTY SHIT.  SERIOUSLY.  DON'T DO IT.  Consider yourself forewarned.

--proceed at your own risk--

 
--what you are about to see cannot be unseen--


--you should really watch cute kitten videos instead of looking at this--


--you're going to regret it if you scroll down because it is really truly gross**--


**Actually, honestly the rat shit doesn't even bother me anymore.  I mean, I'm, like, aware that it's disgusting, but after a whole year of living in this formerly infested house I'm pretty blasé about it.  Roof rats don't carry hantavirus, and all these turds are really old, and I just don't care that much at this point.  Which is probably why I was okay with whipping out my phone to take a bunch of pictures of feces.  Quick anecdote to 1) show how far I've come in my relationship with rodent shit, and 2) give you another opportunity to back out if you're still not sure whether or not you want to see what I'm about to show you:

When we lived in New Haven, our apartment was the second story of an absolutely beautiful house that'd been built in the 1890's.  It was in an awesome neighborhood (if you're familiar with the area, we were just a block down Orange Street from East Rock Park) where we could walk to bars, grocery markets, downtown, parks, everything.  The apartment had high ceilings, two huge bay windows, a butler's pantry, thick original moldings, a private screened porch, old glass doorknobs on six-panel doors, gorgeous glossy hardwood floors, the works.  I loved it passionately.  Anyway, one day I was standing in the butler's pantry talking to my mom on the phone and idly dusting the countertop, and I noticed these little black bugs hanging out near my potatoes.  I picked one up and then, realizing that what I was holding was actually not a bug but was instead a mouse turd, I screamed into the phone.  I skipped work and disinfected the entire kitchen.  I cried the whole time.  Flash forward to now, when there are inch-long rat turds raining down from the ceiling, and all I want to do is take a picture.  Life is funny.

Okay, are you ready?

Nice nest, huh?

Captive rat turds dangling from the insulation.

 Hi there, rat holes!

 This was the biggest nest.
 
 Pile of contaminated insulation.

 Ick.

So after we pulled all the old insulation down and rolled it up into a giant burrito using the plastic drop cloths I'd put down on the floor, we carted it out to our dumpster.  Which is now full of poop.  So, yeah, we'll be re-insulating before we drywall.

*Which is my all-time favorite acronym-- Google it if you aren't familiar.

Tuesday, August 6, 2013

Third Bedroom, We Barely Knew Ye (Thank God)

Before we totally rip the third bedroom and laundry room apart, I thought we should do a brief retrospective.  Let's take a quick look back at the way they were when we moved in, shall we?

View from kitchen door through laundry room, attic stairs extended, tool closet on the right, horrible filthy mismatched curtains on the big old window:


Laundry room and broken-down attic stairs in all their...glory?


Laundry room a quick coat of paint or four, new appliances, and a curtain over the weird closet-nook:


Blurry photo from the other direction:


Plans for this space:

1.  Move light fixture (i.e., bare bulb dangling from the ceiling) and replace with this.
2.  Build wall to frame out what will eventually become a half bath in the back of the space (the end of the room from whence the above photo was taken.
3.  Hang bathroom door.
4.  Convert tool closet so it opens from the bedroom rather than the laundry room; this will involve replacing the paneling on the back with paneling we remove from the 3rd bedroom.  Ditto the new wall we're building.
5.  Install engineered hardwood flooring in the laundry-room side.
6.  Use bathroom side as a storage closet until we have enough scratch for a half-bath.
7.  Demo cabinets above washer / dryer.
8.  Replace attic stairs and drywall the ceiling.
9.  Build new shelving for laundry supplies.
10.  Trim to match the rest of the house, paint.
11.  Replace the door (and hardware, naturally) between the kitchen and laundry rooms with a glass-paned French door.

Whew, that's a lot of stuff.  Anyone wanna take bets on how much of this we will ever get done?

Now onto the third bedroom:


What we're about to do:

1. Remove acoustical tile ceilings and furring strips, carpet, pressboard tile, paneling, and brick pad / mortar
2.  Get our electricians (an awesome husband-and-wife duo) out to cap off the junction box in the ceiling (the ceiling is too low for an overhead fixture), safely remove the old (unnecessary) baseboard heating and disconnect the wiring, move the outlets (which for some reason are located halfway up the walls) down to the baseboards where normal people put their electrical outlets, and replace the outlets with GFCIs.  We really like our electricians, so I don't feel weird about giving them all that money.  
3.  Drywall the walls and ceilings.
4.  Have the window replaced with one that opens, not only for comfort's sake, but because the we need an egress window in order to have a legal third bedroom.  Happening August 13 on our one-year homeowning anniversary!
5.  Trim windows, doors, and baseboards with moldings that match those in the rest of the house.
6.  Install floating engineered hardwood floors.
7.  Paint.

We're hoping to have a lot of the bedroom work done when my parents arrive in two weeks-- that way they can help us where we clearly need it most (the laundry space).  We'll update as we go, and I can't. freaking. wait. to show off some After photos.  Our first dumpster is arriving tomorrow morning, and the quest for flooring continues.  If you have any good karma to send our way, we'd appreciate it!

PS: You know you're busy when both you and your spouse forget your wedding anniversary until your mom calls to wish you a happy one.  Yep.  That just happened.